Thermal Bridging in Roofs and Framing

This post is part of a series on thermal bridging.

Warm air rises, so you can imagine roofs are kind of a big deal when it comes to thermal anything. Point of fact, your roofing system’s thermal performance is a major factor in your building’s overall thermal performance. And one sure-fire way to sabotage the whole deal is to ignore thermal bridging – the movement of heat through thermal-conductive materials. 

Roofs top off your building’s thermal boundary or envelope. You may think that an attic provides an adequate barrier and insulating your ceiling is enough, but there are some serious reasons to intentionally address thermal bridging whether you’re smoothing out blueprints or staring down a renovation project. 

Read on to discover how reducing thermal bridges can help you: 

  • keep your energy costs from going through the roof (literally)
  • avoid extreme temperatures in your attic
  • prevent condensation problems
  • reduce the potential for ice dams
  • ensure the longevity of your roof

The good news: Thermal bridging is avoidable. As with any project, it’s possible to go overboard, so recognize the point of diminishing returns, stop there, and enjoy your energy savings.

Recap: What is thermal bridging?

Thermal bridging is the movement of heat through a material that’s more conductive than the air around it. Failure to mitigate can account for overall heat loss of up to 30% – so it’s not a thermodynamics lesson to be taken lightly. (Brush up on Thermal Bridging 101 here.)

When it’s cold outside, the heat inside your building will make its way through wood as much as three times easier than it will move through insulation (and steel is even happier to move heat). So insulation is a good move. But only part of the solution, because mitigating thermal bridging through structural elements and anything that penetrates your building’s envelope is key to building a more efficient building.

To be clear, improved energy performance and energy savings are great, but addressing thermal bridging means you’ll also get a more comfortable and durable building – both in terms of temperature and because you won’t find yourself dealing with fallout from moisture problems down the road.

In this series, we’ve covered how to navigate thermal bridging when it comes to windows, wandered out to decks, cantilevers, and balconies, and drilled down to foundations and footers. Now let’s take a look up at the roof.

Challenges for roofs

We talk a lot about building envelopes, and the roof is part and parcel. The key principle here: Maintain a continuous thermal boundary to help prevent thermal bridging. But before you forge ahead too enthusiastically, take your pick from this list of challenges to make your design phase more exciting: 

Pre-built challenges

Maybe the previous builders used too much heat-transferring wood to construct the roof joists (or worse, filled awkward spaces with wood). Maybe the angle of the roof slope leaves you gaps and tight spaces that make filling with insulation difficult.

Attic temperature control

In a perfect world, you want your attic to feel as close to outside temps as possible. And because hot air rises, clearly the top-most part of your building presents a special challenge. In cold seasons, you’re focused on keeping the warm air in. In warmer weather, it’s all about moving heat out to keep your interior cool. So there’s a balance to strike between venting and insulation when trying to encourage your attic to cycle heat and moisture up and out.

Venting

We won’t get into venting here to stay focused, but it’s worth a mention: you’ll probably want to consider ridge or gable vents that can quickly dissipate heat and maybe even draw cooler air in from outside.

Condensation

If you’re doing an exceptional job keeping your attic cool in summer, you may end up seeing condensation on the underside of the roof deck due to warmer, moister air outside. Any interior cold spots (think A.C. pipes or vents) can also lead to condensation, moisture damage (mold and mildew) and heat loss. And that moisture buildup can cause damage to your roof deck. In winter, the opposite scenario is relevant, with condensation forming on the underside of the decking. 

Roof perimeters

Air sealing is an important part of building a strong building envelope. When air leakage happens at the roof perimeter, you’ll see issues like frost inside the attic (even snow blown inside), ice damming at the edge of the roof, condensation buildup on the fascia, and metal corrosion. You need airflow to help your attic cycle heat and moisture away.

Ice damming

Winter weather can be relied on for its inconsistency. Snow and sunshine are both hitting your roof from above, with the sun usually doing its job to melt the snow. Whatever the sun doesn’t melt, heat transfer from your warm attic will probably make short work of. Sounds great, right? Except these melt-freeze-melt-freeze cycles can put you in a real pickle when the melted snow has the audacity to re-freeze at the edge of the roof where it’s colder, backs up, and then dams under your roof shingles. Great.

Skylights and other penetrations

Structural elements that penetrate the roof (remember, the roof is part of your building envelope) create a thermal bridge. Chimneys, railings, vents, plumbing stacks, skylights – all potential penetration perpetrators. Yes, skylights generally have poor thermal performance. But are they wonderful? They sure are. Traditional installations tend to forgo thermal breaks in the frame, so significant thermal bridging tends to be common around the perimeter of skylights. There are ways to mitigate energy loss, such as wrapping the framing in insulation and ensuring thermal continuity throughout the skylight support. 

Roof-to-wall transitions

Flashing, blocking, and structural supports all decrease R-value. But sealing the roof-wall connections is critical. Do what you can to select non-conductive flashing materials that will minimize thermal bridges and mitigate the rest with spray foam and other insulation products.

Support framing

Wood framing directly conducts heat and cold. If you’re using steel studs, well, then thermal bridging becomes an even bigger deal. And you’re almost certainly using metal fasteners – maybe even hundreds of them across the entire roof. One solution to the fasteners issue is to use a low-density foam to adhere the insulation, but there’s a better way overall… read on for a straightforward solution to many of these roofing woes.

Thermal Bridging and Roofs
For an even better visual take a look at these thermal images.

Mitigation strategies

The roof has one job: Keep the weather outside. But because weather can be crazy (and seems to be getting crazier), tasking the roof with keeping the peace between inside and out can be more challenging than it seems.  There are two approaches to roofing strategy, and it all comes down to whether it makes more sense in your climate to keep your roof warm or cool. 

Warm roof vs. cool roof

Cool roof

A cool roof is:

  • Traditional (most existing buildings likely use this approach)
  • Vented
  • Utilizes insulation placed above the ceiling to maintain temperatures
  • Has an advantage for warmer climates because venting allows heat to escape faster

Insulation is placed between and hopefully above the rafters or joists with (sometimes) extra insulation underneath, along the ceiling. Now, if you’re retrofitting an existing building, this could get tricky real fast. You may have to open up the roof from the outside or even underneath by taking down the ceiling to add insulation, and you may lose ceiling height inside the room. Plus, when you’re cutting the insulation to fit in each nook and cranny, you have to be pretty precise to get the coverage right. 

On the upside, a well-insulated, ventilated roof can help to control or prevent condensation and the formation of ice dams by allowing heat to escape through the roof in the winter months.

Warm roof

Instead of insulating between the rafters, the warm-roof approach relies on insulation placed OVER the roof deck. In this case, rigid insulation is simply installed on top of the existing surface. This ensures the entire roof structure is insulated – which lends itself to being more energy efficient. 

A warm roof is:

  • Usually not ventilated
  • Rigid foam insulation is attached directly over the roof deck
  • Heat is contained in the attic space or there is no attic (in the case of vaulted ceilings or low slope roofs)
  • Growing in popularity for new builds

With the insulation placed outside, if water or air ducts are run through your attic space, they’ll be less likely affected by extreme temperatures, saving you money on utility costs.

This approach is not terribly difficult to implement when retrofitting an existing building, with one note: By putting insulation over the existing roof level, you will add extra height to your roof that may require reviewing your local code as well as making adjustments to your exterior design details (fascia board, decorative trim, and so on).

Exterior rigid insulation

In keeping with our aim to create an unbroken building envelope, wrapping your building with exterior rigid insulation (warm roof) is the best strategy across the board. Be sure to use materials that are less conductive, like fiberglass, mineral wool, cellulose or high-strength foam – or our favorite, Rockwool. Continuous rigid insulation is so effective that some builders are actually foregoing interior insulation because it’s unnecessary at that point!

But wait, isn’t cavity insulation just easier? You might think so. You could use a dense-pack, blown-in cellulose or fiberglass insulation (preferred over trying to squeeze hand-cut batts into cavities) or a more expensive closed-cell spray foam, but you will inevitably find some tight spaces where it’s tricky at best to get the needed amount of insulation stuffed in – usually where the roof slope approaches the exterior walls. For this, there’s a great solution called the raised-heel truss which we’ll get into in just a minute…

Continuous insulation

Having a continuous insulation layer is critical– especially if you’re using any metal framing. Any supports for the insulation layer should be low-conductive or thermally broken. Sure, the support system is bound to have some negative effect on your R-value, but the overall performance advantages still give continuous insulation an advantage over cavity insulation options.

When you’re installing continuous insulation, your layers should be (from the outside): thermal control, water control, air control, vapor control. This should match up with the layers on the walls of your structure.

Seam taping / Air barriers

Seam tape (Majcoat, Fentrim F, and Wigluv for roofs) prevents air and moisture transfer where your rigid insulation boards join and at corners and joints. This helps to prevent condensation at the seams where air might travel through, bringing moisture with it. Seam tape is often used on foil-backed rigid Polyiso (closed-cell, rigid foam board insulation) which also acts as your WRB (water-resistant barrier). Another option is to make sure your WRB is airtight prior to installing the continuous rigid on the exterior. So many options!

Fascia boards

When baby it’s cold outside, and your attic is nice and cozy (or the A.C. is humming during a hot, humid summer), dew point along the fascia board is a real concern. What’s happening here is that moisture wants to drop out of the air onto a cooler surface – in this case, your fascia board. Continuous exterior insulation will help, but if you’re aiming for a cool roof or want to overprotect your fascia, you can also fill the space between the joists with insulation so it’s continuous through the ceiling to the point behind the fascia. 

To insulate the joist gaps or not to insulate?

If you’re installing rigid exterior insulation, it’s probably overkill to insulate the joist gaps. If you can’t do rigid exterior for any reason, or are going for a cool-roof strategy, then absolutely insulate between the joists. A well-insulated, airtight ceiling (so make sure to add air and vapor barriers, too) will help reduce heat loss into the attic in the winter, and save you money in the summer. You can then add spray foam to enhance the air seal at the perimeter, where the walls meet the roof. 

Raise the roof for raised-heel trusses

Where the roof slopes down to meet the wall there’s usually not enough room to install enough insulation.  We’re talking 4’’ vs. 12’’ from the rest of the roof, and in an area where you’re probably going to lose more energy. So that’s not great. (Yes, if you’re doing rigid continuous exterior insulation you’ll still want to look at adding a little extra insulation to your roof-wall connection.) Here’s a great post from the Energy Vanguard blog (with pictures!) for more on this.

With new construction (or serious retrofits), the solution is to add raised-heel trusses (aka “energy heel trusses” or just “energy trusses”). The raised-heel truss approach adjusts the framing at the edge to add height, effectively raising the roof to give you all the room you need for installing insulation that won’t get compressed in that space. Voila, adequate (if not great) insulation over the exterior walls at the eaves. Bonus: You might solve some wind washing problems (air from outside circulating in your attic) while you’re at it.

R-values

It makes sense that since warm air rises, R-values should be higher for attics and cathedral ceilings vs. what you would need for a wall. Not to mention, energy code requirements for the R-value of roofing insulation are becoming more stringent, often requiring an increased thickness of insulation.

There’s no blanket answer for figuring out your target roof R-value. Start by considering your local climate and ideally use Passive House Modeling. Colder climates might necessitate R-values of 60 and even higher – R-100 is not unheard of for a Passive House. In milder climates, you might get away with more like R-30. 

Compensating for poor design

Obviously, addressing thermal bridging is most effective when tackled at the design phase. But sometimes we don’t have that luxury, and there are solutions that can be applied during construction or renovation. In areas where you’re seeing thermal bridging, closed-cell spray foam or even aerogel products can come to the rescue. While probably not cost-effective compared to eliminating thermal bridging in the design phase, you should also weigh the cost of applying these solutions against simply accepting some minor heat losses. 

“And now that you don’t have to be perfect, you can be good.” (Thanks for the permission, John Steinbeck.)

Wrapping it up

Exterior rigid insulation is a great solution for protecting your building envelope as you design your roof. But, it’s not the only solution — we’re going to cover another popular method, framing with double-stud walls, in a future post. 

Serious about energy efficiency and want to get thermal bridging right on your next project? Talk to us.

Want to learn more about the impact of thermal bridging? Start with this post: What Are Construction Thermal Bridges in Buildings?

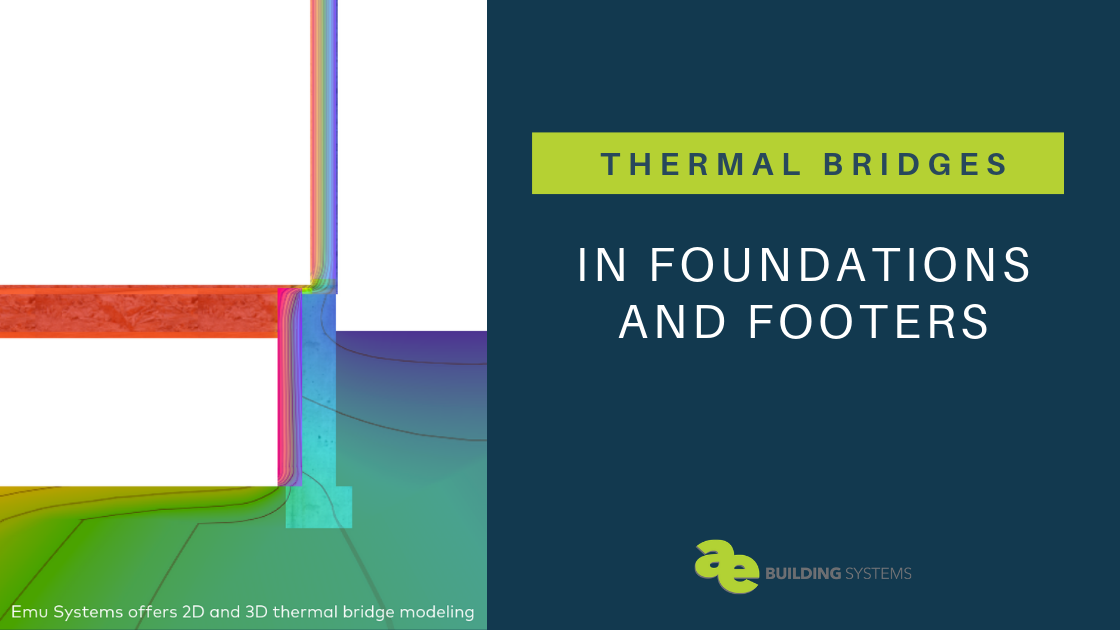
Thermal Bridging in Foundations and Footers

This post is part of a series on thermal bridging.

Exposed concrete foundations are notorious for glowing yellow on thermal imaging. All that concrete acts as a highway for heat to leave the building, and should be given as much attention as windows, balconies, and the rest of the building envelope.

Let us join the chorus of builders in emphasizing that it’s not just about heat loss. When you have an uninsulated basement wall or slab, yes, you’ll certainly see lower interior temperatures. But the direct result of a lower interior temperature is not just a cooler space, it’s also an environment where condensation is likely to form. And no one wants a damp, dank, musty environment at the base of their building.

Recap: What is thermal bridging?

Thermal bridging (also called a cold bridge, heat bridge, or thermal bypass) is the movement of heat through a material that’s more conductive than the air around it. Thermal bridging can account for heat loss of up to 30%, so you can imagine the importance of addressing this when constructing your foundation! (Brush up on Thermal Bridging 101 here.)

Which materials act as heat highways, you ask? Steel, concrete, and wood (core construction materials) are prime offenders – and can’t really be avoided when building. But you CAN take into account some design considerations that will minimize thermal bridging, if not stop it in its tracks.

We’ve covered how windows are a prime offender for thermal bridging in your home, and we addressed some design considerations for decks, cantilevers, and balconies. Now, let’s drill down into foundations and footers.

Challenges for foundations

If you’ve ever had a basement, you may have noticed that any musty smell becomes stronger in the summer months. That’s because the warmer, more humid air is coming in contact with cooler surfaces that are below the dewpoint of the air inside (more on dewpoint in a minute). Particularly guilty are rim joists, as they tend to run colder.

In a two-story home, basements can account for 10-30% of the home’s annual heat loss in winter – more for a single-story building. Let’s take a look at what’s happening where.

Heat loss

All the cement, studs, and supports that go into shoring up a foundation are perfectly primed for thermal bridging if you don’t take the necessary steps to insulate and construct appropriately.

You might think, “heat loss, no biggie for a basement.” But it’s not just about reducing energy bills and keeping temps comfortable. As we mentioned, because thermal bridging also moves condensation and wetness along those pathways, enter the potential for expensive damage due to moisture and mold.

Moisture

Let’s do a little refresher on dew point.

When a thermal bridge whisks that heat out, you get cooler interior surfaces (good if you wanted a root cellar, not so good if you’re hoping for a cozy place to hang out). And those cooler interior surfaces invite moisture – the root cause of mold, mildew, and decay. Why? It’s all about dew point, the temperature at which the vapor in the air begins to condense.

To control moisture, it’s more or less a matter of properly insulating your foundation and installing vapor barriers. We’ll get to that in a minute.

Foundation-to-wall transitions

One particular area to keep in mind is where the foundation meets the rest of the house – a particularly problematic area for thermal performance. Foundations of course are still considered part of your building envelope, so wherever the concrete (slab, foundation, or foundation wall) meets the exterior wall will need extra attention because any insulation at those points is generally non-continuous.

Challenges for footers

Footers are typically poured concrete with rebar reinforcement and set just underground. Footers support the foundation and help prevent settling. You may also find yourself constructing a footer for a deck, pergola, wall, or garage.

While heat loss through footers can be reasonably low, if you’re going for Passive House, you’ll still need to address it.

Mitigation strategies

When it comes to thermal bridging, two things are critical to consider when constructing your foundation or footer: Insulation (interior, exterior, midlayer) and permeability (vapor and air barriers). Keep this in mind: Your goal is to keep the interior warmer than the exterior in the winter. However, condensation can also happen in summer when the air can hold more moisture.

Insulation

Foundations, basements, and crawl spaces can be insulated internally, externally, between layers of concrete, or both internally and externally. While exterior insulation is the most effective, interior insulation is more common – but it comes with more moisture problems.

Interior or exterior, you may want to check which materials are recommended for your climate zone, as your insulation needs will depend on temperature and humidity ranges in your region.

Exterior insulation

Let’s cover exterior insulation first.

In a perfect world, the best solution is to wrap the exterior of your entire building envelope with rigid insulation, including the foundation.

For below-grade foundations, select an insulation material that can withstand conditions underground, which means it should hold up to moisture, freezing, and thawing. If your insulation will be in direct contact with the soil, extruded polystyrene (XPS) holds up well and will retain most of its original R-value. However, XPS has some reasonably concerning environmental drawbacks (global warming!). Higher-density, rigid mineral wool board is a more environmentally considerate choice.

Heat loss tends to be greatest at the corners of a building (where more material is in contact with the soil which absorbs more heat away from the walls). So, it helps to overlap the insulation at corners – including recesses for doors and windows.

Bonus: Insulation installed outside the foundation wall, as a wing or straight down vertically, can help prevent or absorb some of the effects of frost heaving (for those of you blissfully in warmer climates, frost heaving is the upward swelling of the soil as it freezes). Contact us if you would like more information on this.

Interior insulation

Interior insulation is designed to protect the interior air in the basement or crawlspace from contact with cold surfaces (the concrete and framing).

At one point or another, you’ve probably stuffed insulation into framing cavities and called it good. It’s easy, it’s cheap… but you’re not stopping thermal bridging through the studs and cold hard concrete floor.

Several options for insulating your stud cavities:

  • ROCKWOOL or fiberglass batts. While a touch more costly, ROCKWOOL is our top choice for several reasons (which we’ll likely explore in a blog post down the road).
  • Open and closed-cell spray foam insulation. Closed-cell spray foam rings in with a high R-value rating. Note that these spray foams act as a vapor barrier at around 2″ thickness. The downside: This creates an impermeable layer which you’ll want to avoid if you have an impermeable layer on the exterior, too. Open-cell spray foam diffuses moisture and can completely fill cavities. The downside: This creates a lot of waste when trimmed. Also, note also the environmental impacts of urethane foams as well as the duration of the air-sealing of urethane. These are likely for another discussion.
  • Flash and batt or flash and fill is a hybrid approach to insulation that combines closed-cell spray foam insulation (to create an air seal) with fiberglass batt (usually, or blown fiberglass, blown cellulose, or sprayed cellulose) insulation.

Whatever you use, aim for an insulation layer with a permeance rating that allows for drying – this will lower the risk of moisture accumulation. (Rule of thumb: The greater the permeance, the greater the drying capability.)

Above-grade foundation insulation

While you’re probably used to seeing exposed concrete meeting the siding, you can imagine this is an undesirable scenario when it comes to thermal bridging.

But the laws of physics are on your side. Simply installing an R-10 insulation from siding to footing can cut heat loss by about 70% (for a heated basement). Applying a protective “board” or coating over the foundation insulation above grade will help protect it from damage due to the trades, sunlight, pests, and … weed whackers. There also are boards and coatings that can be colored and textured so as to add to the building’s visual appeal.

Notes for footers and foundation walls

While many kinds of rigid foam insulation have a good compressive strength higher than most soils, you may still want to consult with a structural engineer to verify the likelihood of “creep” – slow compression of the insulation under the footings. One option that is getting more recognition is foam glass. It can be costly but has great compressive strength.

Insulation on the interiors of any stem walls and a horizontal layer of continuous rigid foam or mineral wool under the slab can help address thermal bridging. A lesser-known option for insulating under the slab is perlite, a naturally occuring, expanded volcanic rock that has similar properties to glass. Contact us to learn more about perlite below slabs.

Retrofitting

If you’re retrofitting a building, focus on insulating the top half or top third and save yourself some digging. Warm air rises!

Vapor & air barriers

Make sure you get a vapor barrier beneath the slab to prevent moisture from rising up through the concrete. A sheet polyethylene will work well for this purpose, as well as a capillary break between the footing and the perimeter of the foundation wall. Then you can use tapes or sealant to seal the basement wall to the slab.

Be very cognizant of the ramifications of using  interior vapor barriers as you’ll want to allow drying. The general idea here is to keep the moisture out (obviously). We talk more about vapor barriers and breathing in this post.

Wrapping it up

Hopefully, this post has helped give you some insight into how to properly address thermal bridging as you construct your foundation or building footers. Now that you know what to look for, you won’t be able to un-see all the uninsulated concrete poking up around your neighborhood!

Serious about energy efficiency and want to get thermal bridging right on your next project? Talk to us.

Want to learn more about the impact of thermal bridging? Start with this post: What Are Construction Thermal Bridges in Buildings?

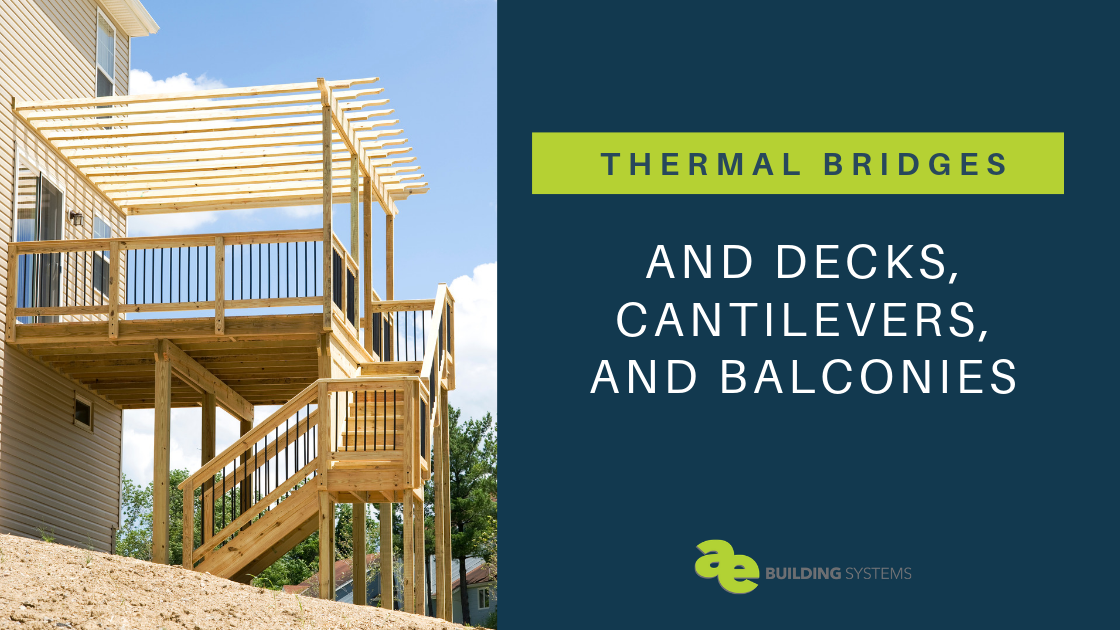
Thermal Bridging and Decks, Cantilevers, and Balconies

This post is part of a series on thermal bridging.

Have you been charged with designing an energy-efficient deck or balcony? Or maybe you’re looking at blueprints with cantilevers that has your gut telling you something’s not quite right. Perhaps you’re a homeowner itching to start a project, but the term “thermal bridging” stopped you in your tracks. Whatever you’re working on, we hope this entry helps clarify what thermal bridging is, why you can’t afford to ignore it, and how to address it appropriately when constructing a deck, balcony, or cantilever.

Recap: What is thermal bridging?

Thermal bridging, quite simply, is the movement of heat through a material that’s more conductive than the air around it. Anytime a thermal-conductive material like steel, concrete, or wood penetrates the building envelope, it creates a highway for heat to exit (or enter) the building. Don’t think it’s worth taking seriously? Consider that this can account for heat loss at a rate of up to 30%! (Want to learn more? Read our 101 here.)

The inefficiencies created by thermal bridging not only reflect poor design, but can result in high energy bills and discomfort for the homeowner. Worse, because these materials move condensation and wetness along with temperature differences, thermal bridging introduces the potential for expensive damage due to moisture and mold. Just think about the havoc persistent moisture within your walls could wreck!

We’ve already covered how windows are a prime offender for thermal bridging in your home. Now, let’s talk about what you need to take into consideration when building a deck or balcony and incorporating cantilevers into your design.

Thermal bridging in action

Thermal bridging is most pronounced with materials like steel (you’re probably thinking of beams and support, but fastening items are guilty too), although wood will also transfer heat. Basically, if you’re designing or constructing any element that projects from or enters the building, you need to pay attention to our points below in order to get energy efficiency right.

A cantilevered steel deck or balcony might as well be a case study for how thermal bridging works. Or, for that matter, a concrete slab (just look at multi-level apartment buildings). Decks and cantilevered design elements project out from their origins within the building, breaking through the building envelope and really quite efficiently conducting heat from (or into) the building.

Imagine these elements as giant radiator fins and you’ll start to get the picture of exactly how thermal bridging works!

However, with the right strategy and materials, you needn’t drop the trending cantilever look from your design toolbox. Stay with us as we get into some solutions and techniques to help you address this problem elegantly and efficiently.

Risks associated with thermal bridging

Heat leaks

Decks, balconies, cantilevered bump-outs, and concrete slabs are notorious for leaking heat. In the winter, you might notice that the interior floor near a deck feels colder to your feet – that’s poor design helping heat escape through the structure of your home.

Keep in mind this is not just about staying cozy: All of this wasted energy costs a homeowner money and impacts the environment.

Moisture issues

Let’s head back to grade school for a second. Remember what happens when warm air hits a cooler surface? You guessed (or Googled) it: Condensation. Now picture those beautiful decks, cantilevers, and balconies. Not only are they exposed to the elements, but when that warm summertime air travels into the AC-cooled building envelope thanks to thermal bridging, not only is condensation bound to happen, but you could soon have a serious mold problem on your hands. It’s not just a wintertime issue.

Working with a pre-built structure? Here’s how to tell if there’s a moisture problem: If you’re lucky enough not to find mold, you’ll see darkened areas where the moisture has attracted dirt.

One last thing to keep in mind here: having a vapor-open approach to the envelope assemblies is important. If moisture condenses with the envelope assemblies, it has to be able to migrate out of the assemblies or you will have mold issues.


Prevention & mitigation strategies

Ultimately, thermal bridging solutions are all about mitigating heat transfer – but let’s not forget air leaks. Use the following tips and tricks to help you “break the bridge.”

Good design

No surprise, preventing thermal bridging starts with good design. And the best way to get good design from the get-go? Tell your architects and structural engineers to work together and think “energy smart” first. (This may sound easier than it is!)

Ideally, good design doesn’t compromise the building envelope – which means you should try to construct your deck or balcony separately from the building and secure via load-bearing brackets to the walls or support independently. Even better, on its own foundation.

For decks:

So best-case scenario for a deck is an independently constructed structure on its own foundation. Otherwise, anywhere that a deck is attached to or penetrates the structure of the building, anticipate thermal bridging to occur. And if heat transfer is happening, you better believe moisture transfer is happening too.

You need a plan to keep air out of your walls, since air (or more precisely, the vapor in the air) is the primary culprit for moisture condensing within the wall assembly. You might consider installing enough continuous rigid exterior insulation so that the dewpoint occurs outside the envelope assemblies. Using a vapor-open approach will help ensure that if your walls do get wet, they can dry.

For balconies:

You might try supporting the outer corners of the balcony with steel rods or cables attached higher up the building – which can add visual appeal to your exterior design. Or, you might support the balcony with wooden brackets affixed to the building’s exterior. You may also be able to support the corners on independent posts, like you would for a deck.

If none of this possible or the design is already set in stone, using the right materials, insulating them, and creating an air barrier can significantly reduce or even eliminate thermal bridging issues. Read on for more about these strategies.

Structural thermal breaks

A thermal break is a material used to block the path of heat transfer. Incorporating structural thermal breaks (like specialized plates, pads, or foam) between a balcony and floor slab can reduce heat transfer by up to 75%. Bonus: This also improves condensation control.

You can purchase manufactured thermally broken balcony connectors from manufacturers such as Schock and Halfen.   

Air sealing & taping

Air sealing is an important step to making sure your building envelope is airtight. Don’t make the mistake of thinking you’ve covered your bases simply by insulating. Air can move around insulation, bringing higher/lower temperatures – and moisture. Since any penetration through the structure breaks the building envelope and creates the potential for airflow, you’ll want to make sure you have a plan for air sealing.

In fact, you should start the air sealing process even before you add any insulation by using a weather barrier system that is also an air barrier. Arguably, adding an interior air barrier can be a belt-and-suspenders approach. Learn about interior air barriers here.  

The Holy Grail here is an airtight, vapor-open building envelope. (There’s even a certification for that. Learn about Passive House.)

Insulation

Exterior insulation is often recommended and should be considered part of that building envelope you want to avoid penetrating. You’ll especially want to insulate around the highly conductive steel studs and structural framing. Here’s one exterior insulation we trust to do the job well.

Continuous rigid exterior insulation is used for wrapping the building structure. Ideally, you are using enough insulation to move the dewpoint out of the structural wall assembly and into the exterior rigid insulation. “Continuous” is the key word here – you want to install it without breaks. If you need to cut out the rigid insulation around penetrations (which would obviously short-circuit your attempts at preventing thermal bridging), taping and spray foam will be your friends.

Double stud construction: With double stud construction, the exterior studs will act as the structure, while the inner studs are used for chases and insulation with a gap between the two. Insulating the gap between the studs provides the thermal break. Decks and balconies can then be bolted to the structural exterior studs. Other cantilevered details like bump-outs are not recommended without an air barrier and a continuous rigid exterior insulation layer.

An educated crew

Ultimately, a well-informed crew (from architects to structural engineers to construction teams) will know what to look for and the steps they can employ to minimize thermal bridging while making the assemblies airtight.

Wrapping it up

We hope this post has helped underscore the importance of addressing thermal bridging and given you some strategies to make your design work. The good news: With these strategies and the right materials, you can significantly lower or eliminate the risk of thermal bridging in your deck, balcony, or cantilever design.

Serious about energy efficiency and want to get thermal bridging right on your next project? Talk to us.

Want to learn more about the impact of thermal bridging? Start with this post: What Are Construction Thermal Bridges in Buildings?


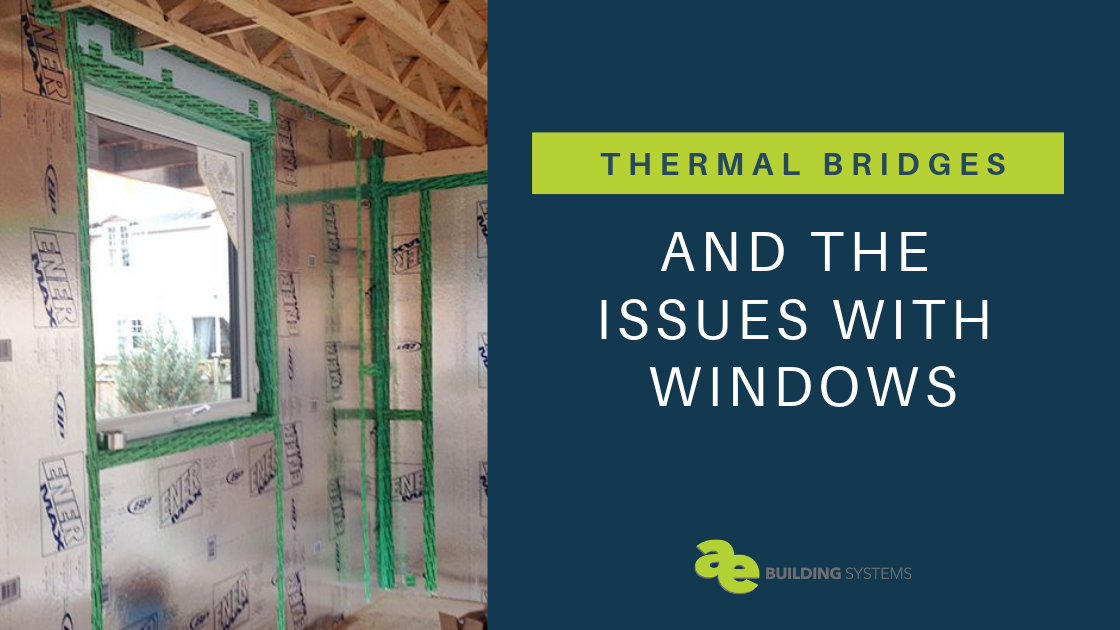
Thermal Bridging and Issues with Windows

As a homeowner, heat loss is or should be a big concern. Energy escaping through the building envelope (walls, roof, floor) means more energy is required to maintain a consistent temperature or better said – comfort -within your home. It also means higher utility bills whether you’re building a new home or looking to refurbish an existing home. One of the most significant considerations should be how to make your home more comfortable but also more energy-efficient – less costly to operate. Which leads us to the topic of Thermal Bridging!

What is thermal bridging?

In a heating climate and similar to air infiltration, thermal bridging results in heat loss and occurs when heat escapes from the inside of the building to the outside, via conduction and through the building envelope. If you’ve ever been in a house that has a “drafty” spot or just constantly feels cold, that’s likely the result of thermal bridging as much as or even more than air infiltration. Even airtight homes can have a heat-losses of 20 to 50 percent due to thermal bridges.

Types of Thermal Bridges

There are several types of thermal bridges that designers, builders, and homeowners should be aware of and the following are three common types:

  • Repeating or Systematic thermal bridges: A common cause of heat loss are repeating thermal bridges which are predictably found inconsistent breaks in the thermal envelope allowing heat to pass through easily. It’s important to keep these in mind during a building’s design. Common Examples include wood and steel studs, steel wall ties, ceiling joists, and insulated suspended floor joists.
  • Non-repeating thermal bridges: This method of heat loss doesn’t follow a pattern in the way that repeating thermal bridges do. A non-repeating thermal bridge tends to pop up in specific areas impacted by an interruption or break in the construction. Common culprits include things that penetrate the thermal envelope to include windows and doors, structural beams, pipes and cables, and cantilevers.
  • Geometrical Thermal bridges: Generally found where the building envelope changes directions and where the materials meet, Geometric thermal bridge examples include wall corners, wall to roof and floor junctions.  The more complex a building design is, the more geometric thermal bridging will be prevalent.

Regardless of the source, avoiding thermal bridges wherever possible is essential – and knowing where your home is losing heat can help you take the proper measures needed to reduce the problem.

Thermal Bridging and Windows

Often, it is windows that are a major culprit when it comes to heat loss and thermal bridging in the home. Standard or code minimum windows often represent a compromise. “We” accept their lower thermal performance because we enjoy the view, natural light, and ventilation they provide. However, when adding high-performance windows with higher R-values (lower U-values), windows become less of a concern for thermal bridging, especially when properly installed.

In an existing home, an expert can determine the state of a home’s windows by doing an inspection. They know what to look for in terms of damage, deterioration, and condition. Knowing a window’s age is a big help as well. Most older windows did not have high-performance glazing nor did manufacturers generally consider thermal bridging in the frames and spacers.

With new construction or existing homes, to reach your energy and comfort goals, it is important to consider high-performance windows. The thermal image below shows the thermal bridging – shown in blue/purple. This is likely why you have seen condensation on windows.

This image below shows the thermal bridging – shown in blue/purple.
The magic of thermal imaging!

Note also high-performance windows help with other variables to include sound attenuation. They reduce the sound coming from the busy street in front of your house for example.

Thermal Bridging Results in Condensation – and Mold

Four variables come into play with condensation: outdoor temperature, indoor temperature, your home’s humidity level, and the indoor surface temperature of an exterior building envelope component. Since outdoor temperatures are not something we have control over, we focus on what is in our control. Windows that have well-insulated frames, multi-panes of gas-filled glass and have higher performance spacers will help increase the interior surface temperature of the windows. Higher interior surface temperatures help to effectively prevent the condensation of moisture on your windows preventing mold from growing. This subsequently improves your air quality. We would be remiss if we didn’t also mention the importance of ventilation systems which improves indoor air quality.

Check out this SIGA Fentrim F for preventing condensation

How To Prevent Window Thermal Bridging

  • Glass: Pursue options that included triple or even quad glazing.
  • Gas: Gas filled glazing is no joke. Argon gas is cost effective and provides a good boost in performance over air-filled units. Krypton gas, while more costly, provides an excellent increase to performance.
  • Frames: Select frames made of low conductive materials. Aluminum frames without thermal breaks are a complete no-no for energy efficiency and comfort. Aluminum is a tremendous conductor of heat. Better options are wood, fiberglass, and PVC with insulating air chambers. These frames are even better if they are insulated. Note, thermally broken aluminum is a good option depending on how good the thermal break is.
  • Spacers: Selecting windows with better spacers can help prevent thermal bridging in the windows as well. These spacers separate the panes of glass and appear where there are divided lights. Avoiding spacers made of aluminum and steel, and selecting stainless steel and various composite materials are much better options. Warm Edge, Super Spacer, and Swiss Spacer are some of the composite spacers that are available.
  • Installation: Proper window installation including air sealing and insulation around the windows will significantly reduce the amount of energy loss. To reduce thermal bridging around windows, Thermal Buck is a great product for the installation.

Final Thoughts

Bringing awareness of thermal bridging to all of your construction partners will aid in your goal. An architect can design to minimize thermal bridges. By not paying attention to the details on the construction site or if there is a lack of training, reaching your goals will be difficult.

If you’re looking for ways to minimize thermal bridges and select high-performance windows for your project, contact us today.

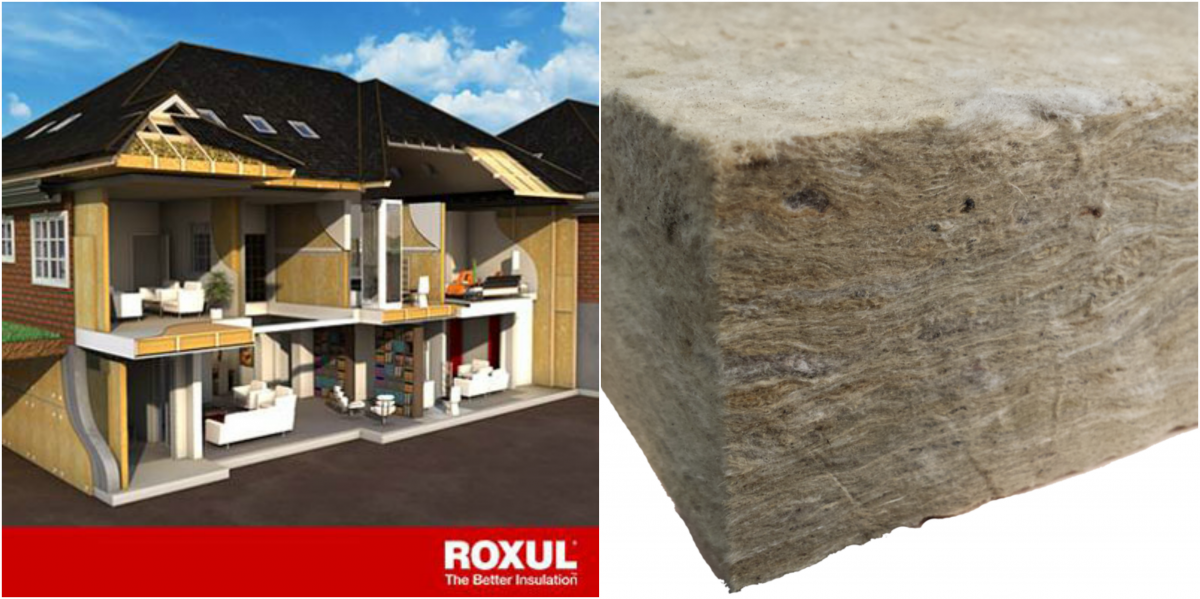
Mineral Wool Insulation: The Naked Truth

Let’s face it. Life is hard.
Sometimes, pressures of work, family and bills can kick us in the teeth. And some days, we’re counting down the minutes to get home, kick off our shoes and chill. Maybe relax to some music or zone out with some Netflix. Better still, remove the confines of the day by removing our clothes – naked with no cares.

Reality, though, comes in the form of an uncomfortable and unhealthy home, as well as peeping Toms and unexpected visits from the in-laws. Just because you can relax in the raw, doesn’t mean you should!

As architects and builders, you may not be able give your clients peace of mind about walking around naked, but you can give them the comfortable sanctuary they crave in a cost-efficient home with clean air and ideal temperatures.

One excellent way to do just that is with mineral wool insulation, a building product made of rock that is heated and spun like cotton candy to create fibers, which are then put into batts and boards. It can be used in new construction or added to existing structures.

Environmentally friendly, it is composed of 85 percent recycled slag from the steel processing industry, and 15 percent raw basalt. Also, EPA testing confirms allergens and toxins are virtually non-existent.

That’s a major plus for all but especially for home owners with children.

Consider these additional, exceptional benefits of using mineral wool insulation:

Fire Resistance

The temperature range for house fires is 1200-1400 degrees F. Mineral wool insulation melts at 2150 degrees F. This means it will not catch fire. Because it is non-combustible, it doesn’t contribute to nor will it spread a fire. In addition, when heated it will not release toxic gases. Simply put, rock doesn’t burn. Designed to maintain its integrity when exposed to flames, mineral wool allows for escape in the event of a fire. Safety should be your number one concern for a client.

Sound Reduction

Mineral wool is an excellent acoustic insulation, because rock is a natural sound barrier. Due to its unique, non-directional structure, mineral wool is denser than conventional insulation and helps to absorb and minimize sound. Owners of concert halls and playhouses find it extremely effective for keeping sound within their buildings. On a smaller scale, your client will appreciate mineral wool keeping sound out for a quieter home. 

Rot Resistance

Mineral wool insulation is permeable, allowing water and vapors to escape. Also, it is somewhat water repellent. And because mineral wool has no food source, it cannot grow mildew, mold or any bacteria. This is good news, not only for those with allergies and health conditions but also for you, the builder or architect, because it helps prevent lawsuits due to wall construction failure. Vapor open assemblies, especially to the exterior, present fewer risks.

Longevity

Mineral wool insulation does not shrink, change shape or crumble – despite temperature changes or humidity. It is maintenance-free and needs no replacement.

Mineral wool perhaps is most celebrated for its thermal properties. Because it contains tiny pockets of air trapped within its physical structure, mineral wool provides extraordinary insulation, creating the down blanket for homes in cooler climates and keeping heat out of homes in warmer climates. The obvious benefit is a reduction of heating/cooling costs. Reduction in energy use plus lifelong durability equals savings in your clients’ pockets over the long-run.

Sustainability

Recycled slag and raw basalt is plentiful, and mineral wool is recyclable. Therefore, resources aren’t drained in the production of mineral wool insulation.

Also, the energy saved from the installation of mineral wood insulation far surpasses the energy spent for its production. The money spent is minimal when compared to the long-term benefits.

The above are all benefits for your client, but there are some serious benefits to you as well. When it comes to new construction and existing buildings, your reputation and business are on the line. Any faulty building product or choice of building assembly can put your insurance premiums at risk. As building codes become more stringent, and wall assemblies become more complex, mineral wool insulation reduces your liability.

Mineral wool insulation is a deal maker, not a deal breaker.

While your clients might or might not enjoy their home naked, you can have peace of mind knowing you’re providing them the comfort to do so.

For more information, contact AE Building Systems.
Source: Roxul.com