
This post is part of a series on thermal bridging.
Warm air rises, so you can imagine roofs are kind of a big deal when it comes to thermal anything. Point of fact, your roofing system’s thermal performance is a major factor in your building’s overall thermal performance. And one sure-fire way to sabotage the whole deal is to ignore thermal bridging – the movement of heat through thermal-conductive materials.
Roofs top off your building’s thermal boundary or envelope. You may think that an attic provides an adequate barrier and insulating your ceiling is enough, but there are some serious reasons to intentionally address thermal bridging whether you’re smoothing out blueprints or staring down a renovation project.
Read on to discover how reducing thermal bridges can help you:
- keep your energy costs from going through the roof (literally)
- avoid extreme temperatures in your attic
- prevent condensation problems
- reduce the potential for ice dams
- ensure the longevity of your roof
The good news: Thermal bridging is avoidable. As with any project, it’s possible to go overboard, so recognize the point of diminishing returns, stop there, and enjoy your energy savings.
Recap: What is thermal bridging?
Thermal bridging is the movement of heat through a material that’s more conductive than the air around it. Failure to mitigate can account for overall heat loss of up to 30% – so it’s not a thermodynamics lesson to be taken lightly. (Brush up on Thermal Bridging 101 here.)
When it’s cold outside, the heat inside your building will make its way through wood as much as three times easier than it will move through insulation (and steel is even happier to move heat). So insulation is a good move. But only part of the solution, because mitigating thermal bridging through structural elements and anything that penetrates your building’s envelope is key to building a more efficient building.
To be clear, improved energy performance and energy savings are great, but addressing thermal bridging means you’ll also get a more comfortable and durable building – both in terms of temperature and because you won’t find yourself dealing with fallout from moisture problems down the road.
In this series, we’ve covered how to navigate thermal bridging when it comes to windows, wandered out to decks, cantilevers, and balconies, and drilled down to foundations and footers. Now let’s take a look up at the roof.
Challenges for roofs
We talk a lot about building envelopes, and the roof is part and parcel. The key principle here: Maintain a continuous thermal boundary to help prevent thermal bridging. But before you forge ahead too enthusiastically, take your pick from this list of challenges to make your design phase more exciting:
Pre-built challenges
Maybe the previous builders used too much heat-transferring wood to construct the roof joists (or worse, filled awkward spaces with wood). Maybe the angle of the roof slope leaves you gaps and tight spaces that make filling with insulation difficult.
Attic temperature control
In a perfect world, you want your attic to feel as close to outside temps as possible. And because hot air rises, clearly the top-most part of your building presents a special challenge. In cold seasons, you’re focused on keeping the warm air in. In warmer weather, it’s all about moving heat out to keep your interior cool. So there’s a balance to strike between venting and insulation when trying to encourage your attic to cycle heat and moisture up and out.
Venting
We won’t get into venting here to stay focused, but it’s worth a mention: you’ll probably want to consider ridge or gable vents that can quickly dissipate heat and maybe even draw cooler air in from outside.
Condensation
If you’re doing an exceptional job keeping your attic cool in summer, you may end up seeing condensation on the underside of the roof deck due to warmer, moister air outside. Any interior cold spots (think A.C. pipes or vents) can also lead to condensation, moisture damage (mold and mildew) and heat loss. And that moisture buildup can cause damage to your roof deck. In winter, the opposite scenario is relevant, with condensation forming on the underside of the decking.
Roof perimeters
Air sealing is an important part of building a strong building envelope. When air leakage happens at the roof perimeter, you’ll see issues like frost inside the attic (even snow blown inside), ice damming at the edge of the roof, condensation buildup on the fascia, and metal corrosion. You need airflow to help your attic cycle heat and moisture away.
Ice damming
Winter weather can be relied on for its inconsistency. Snow and sunshine are both hitting your roof from above, with the sun usually doing its job to melt the snow. Whatever the sun doesn’t melt, heat transfer from your warm attic will probably make short work of. Sounds great, right? Except these melt-freeze-melt-freeze cycles can put you in a real pickle when the melted snow has the audacity to re-freeze at the edge of the roof where it’s colder, backs up, and then dams under your roof shingles. Great.
Skylights and other penetrations
Structural elements that penetrate the roof (remember, the roof is part of your building envelope) create a thermal bridge. Chimneys, railings, vents, plumbing stacks, skylights – all potential penetration perpetrators. Yes, skylights generally have poor thermal performance. But are they wonderful? They sure are. Traditional installations tend to forgo thermal breaks in the frame, so significant thermal bridging tends to be common around the perimeter of skylights. There are ways to mitigate energy loss, such as wrapping the framing in insulation and ensuring thermal continuity throughout the skylight support.
Roof-to-wall transitions
Flashing, blocking, and structural supports all decrease R-value. But sealing the roof-wall connections is critical. Do what you can to select non-conductive flashing materials that will minimize thermal bridges and mitigate the rest with spray foam and other insulation products.
Support framing
Wood framing directly conducts heat and cold. If you’re using steel studs, well, then thermal bridging becomes an even bigger deal. And you’re almost certainly using metal fasteners – maybe even hundreds of them across the entire roof. One solution to the fasteners issue is to use a low-density foam to adhere the insulation, but there’s a better way overall… read on for a straightforward solution to many of these roofing woes.
Mitigation strategies
The roof has one job: Keep the weather outside. But because weather can be crazy (and seems to be getting crazier), tasking the roof with keeping the peace between inside and out can be more challenging than it seems. There are two approaches to roofing strategy, and it all comes down to whether it makes more sense in your climate to keep your roof warm or cool.
Warm roof vs. cool roof
Cool roof
A cool roof is:
- Traditional (most existing buildings likely use this approach)
- Vented
- Utilizes insulation placed above the ceiling to maintain temperatures
- Has an advantage for warmer climates because venting allows heat to escape faster
Insulation is placed between and hopefully above the rafters or joists with (sometimes) extra insulation underneath, along the ceiling. Now, if you’re retrofitting an existing building, this could get tricky real fast. You may have to open up the roof from the outside or even underneath by taking down the ceiling to add insulation, and you may lose ceiling height inside the room. Plus, when you’re cutting the insulation to fit in each nook and cranny, you have to be pretty precise to get the coverage right.
On the upside, a well-insulated, ventilated roof can help to control or prevent condensation and the formation of ice dams by allowing heat to escape through the roof in the winter months.
Warm roof
Instead of insulating between the rafters, the warm-roof approach relies on insulation placed OVER the roof deck. In this case, rigid insulation is simply installed on top of the existing surface. This ensures the entire roof structure is insulated – which lends itself to being more energy efficient.
A warm roof is:
- Usually not ventilated
- Rigid foam insulation is attached directly over the roof deck
- Heat is contained in the attic space or there is no attic (in the case of vaulted ceilings or low slope roofs)
- Growing in popularity for new builds
With the insulation placed outside, if water or air ducts are run through your attic space, they’ll be less likely affected by extreme temperatures, saving you money on utility costs.
This approach is not terribly difficult to implement when retrofitting an existing building, with one note: By putting insulation over the existing roof level, you will add extra height to your roof that may require reviewing your local code as well as making adjustments to your exterior design details (fascia board, decorative trim, and so on).
Exterior rigid insulation
In keeping with our aim to create an unbroken building envelope, wrapping your building with exterior rigid insulation (warm roof) is the best strategy across the board. Be sure to use materials that are less conductive, like fiberglass, mineral wool, cellulose or high-strength foam – or our favorite, Rockwool. Continuous rigid insulation is so effective that some builders are actually foregoing interior insulation because it’s unnecessary at that point!
But wait, isn’t cavity insulation just easier? You might think so. You could use a dense-pack, blown-in cellulose or fiberglass insulation (preferred over trying to squeeze hand-cut batts into cavities) or a more expensive closed-cell spray foam, but you will inevitably find some tight spaces where it’s tricky at best to get the needed amount of insulation stuffed in – usually where the roof slope approaches the exterior walls. For this, there’s a great solution called the raised-heel truss which we’ll get into in just a minute…
Continuous insulation
Having a continuous insulation layer is critical– especially if you’re using any metal framing. Any supports for the insulation layer should be low-conductive or thermally broken. Sure, the support system is bound to have some negative effect on your R-value, but the overall performance advantages still give continuous insulation an advantage over cavity insulation options.
When you’re installing continuous insulation, your layers should be (from the outside): thermal control, water control, air control, vapor control. This should match up with the layers on the walls of your structure.
Seam taping / Air barriers
Seam tape (Majcoat, Fentrim F, and Wigluv for roofs) prevents air and moisture transfer where your rigid insulation boards join and at corners and joints. This helps to prevent condensation at the seams where air might travel through, bringing moisture with it. Seam tape is often used on foil-backed rigid Polyiso (closed-cell, rigid foam board insulation) which also acts as your WRB (water-resistant barrier). Another option is to make sure your WRB is airtight prior to installing the continuous rigid on the exterior. So many options!
Fascia boards
When baby it’s cold outside, and your attic is nice and cozy (or the A.C. is humming during a hot, humid summer), dew point along the fascia board is a real concern. What’s happening here is that moisture wants to drop out of the air onto a cooler surface – in this case, your fascia board. Continuous exterior insulation will help, but if you’re aiming for a cool roof or want to overprotect your fascia, you can also fill the space between the joists with insulation so it’s continuous through the ceiling to the point behind the fascia.
To insulate the joist gaps or not to insulate?
If you’re installing rigid exterior insulation, it’s probably overkill to insulate the joist gaps. If you can’t do rigid exterior for any reason, or are going for a cool-roof strategy, then absolutely insulate between the joists. A well-insulated, airtight ceiling (so make sure to add air and vapor barriers, too) will help reduce heat loss into the attic in the winter, and save you money in the summer. You can then add spray foam to enhance the air seal at the perimeter, where the walls meet the roof.
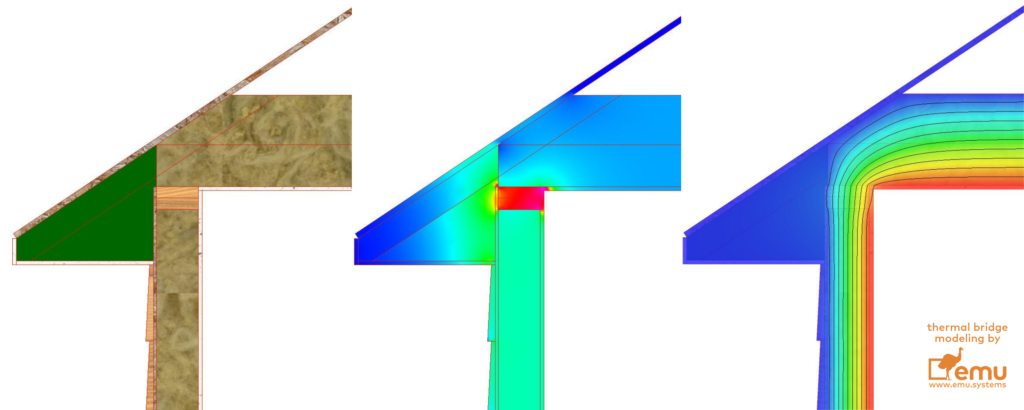
Raise the roof for raised-heel trusses
Where the roof slopes down to meet the wall there’s usually not enough room to install enough insulation. We’re talking 4’’ vs. 12’’ from the rest of the roof, and in an area where you’re probably going to lose more energy. So that’s not great. (Yes, if you’re doing rigid continuous exterior insulation you’ll still want to look at adding a little extra insulation to your roof-wall connection.) Here’s a great post from the Energy Vanguard blog (with pictures!) for more on this.
With new construction (or serious retrofits), the solution is to add raised-heel trusses (aka “energy heel trusses” or just “energy trusses”). The raised-heel truss approach adjusts the framing at the edge to add height, effectively raising the roof to give you all the room you need for installing insulation that won’t get compressed in that space. Voila, adequate (if not great) insulation over the exterior walls at the eaves. Bonus: You might solve some wind washing problems (air from outside circulating in your attic) while you’re at it.
R-values
It makes sense that since warm air rises, R-values should be higher for attics and cathedral ceilings vs. what you would need for a wall. Not to mention, energy code requirements for the R-value of roofing insulation are becoming more stringent, often requiring an increased thickness of insulation.
There’s no blanket answer for figuring out your target roof R-value. Start by considering your local climate and ideally use Passive House Modeling. Colder climates might necessitate R-values of 60 and even higher – R-100 is not unheard of for a Passive House. In milder climates, you might get away with more like R-30.
Compensating for poor design
Obviously, addressing thermal bridging is most effective when tackled at the design phase. But sometimes we don’t have that luxury, and there are solutions that can be applied during construction or renovation. In areas where you’re seeing thermal bridging, closed-cell spray foam or even aerogel products can come to the rescue. While probably not cost-effective compared to eliminating thermal bridging in the design phase, you should also weigh the cost of applying these solutions against simply accepting some minor heat losses.
“And now that you don’t have to be perfect, you can be good.” (Thanks for the permission, John Steinbeck.)
Wrapping it up
Exterior rigid insulation is a great solution for protecting your building envelope as you design your roof. But, it’s not the only solution — we’re going to cover another popular method, framing with double-stud walls, in a future post.
Serious about energy efficiency and want to get thermal bridging right on your next project? Talk to us.
Want to learn more about the impact of thermal bridging? Start with this post: What Are Construction Thermal Bridges in Buildings?
Leave a Reply